Sourdough Bread

These last few weeks I have been keeping a pet at home. It requires attention every day, and feeding regularly. It definitely smells. But that’s where the comparison stops, as this pet certainly isn’t fluffy, and doesn’t greet you looking for food when you get home at the end of the day. No, I’ve been keeping a sourdough starter, which we have taken to calling “Saccy”, after the latin name for yeast, Saccaromyces cerevisiae.

Sourdough starters are used, unsurprisingly, to make sourdough bread. My first experience of proper sourdough bread was on a windy pier in San Francisco, where we had one of the famous Boudin Bros. sourdough rolls hollowed out and filled with clam chowder. After eating the steaming hot clam chowder, we tore apart the bread, now soaked in creamy soup, and finished that off too. I found I wasn’t particularly a fan of the sour taste- something that puts a lot of people off sourdough bread- but the texture was fantastic. Another feature of sourdough bread, the idea of having a starter in the fridge that matures, and that you keep developing as you make more and more bread, really appealed too. So recently, as I have been getting more confident with making breads, I thought I would give making sourdough bread a go.

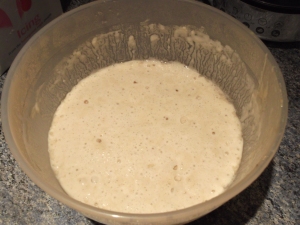
Sourdough Starter on Day 1. Just a lump of watery flour at this point.

Sourdough Starter on Day 1. Just a lump of watery flour at this point.

The interesting thing about sourdough starters is that they don’t contain any yeast- at least any added yeast. You simply take whatever yeasts are floating around in the air when you are making the starter, and by having plenty of flour available for growth, you’ve got a fermentation going. But the yeast isn’t all you get in the air. You also get some bacteria, and it’s these bacteria which produce acid, which makes the bread sour. The bacteria also prevent spoiling and reduce the speed at which the bread becomes stale, and before the industrialisation of baking, these were desirable features to have in bread. But these bacteria do have to be taken into account while cooking. According to Harold McGee’s McGee on Food and Cooking:

Because growing microbes consume nutrients rapidly, and produce acid and other growth-inhibiting substances, starters need to be divided and refreshed regularly, two or more times per day. Adding new water and flour dilutes the accumulated acids and other growth inhibitors, and provides a fresh supply of food. Aerating the starter- whisking a liquid one, or kneading a doughy one, supplies the oxygen that yeasts require to build cell membranes for new cells. The more frequently a starter is divided and refreshed, the better the yeasts will be able to grow, and the more leavening power the starter will have. (McGee on Food and Cooking, p545).

For logistical reasons, I can’t divide a starter two or more times a day, but if you are able to, you should get a better quality product. Here’s how I made my starter, based on a recipe from The Forgotten Skills of Cooking.

Sourdough Starter on Day 3. Starting to get some action, and definitely smelling yoghurty.

Sourdough Starter on Day 3. Starting to get some action, and definitely smelling yoghurty.

How to make a sourdough starter
Day 1: In a large bowl (1.5 litres was fine for me), put 50g strong white bread flour and 50g tepid water, give a good stir, cover, and leave for 24hrs.
Days 2-6: Add to the starter 50g strong white bread flour and 50g tepid water, give a good stir, cover, and leave for 24hrs.

According to McGee, the yeasts grow optimally at 20-25ºC, whereas the bacteria grow optimally in a warmer environment, at 30-35ºC. For this reason, you don’t have to worry about keeping the starter any warmer than room temperature. This also applies to the dough, so the usual rules of sticking the dough somewhere warm to rise or prove don’t apply.

Once you’ve got the starter, you can begin to make the actual bread. Because of the acids present, sourdoughs are not particularly good risers, even when you give them ideal growing conditions. Consequently the rising times are very long, days in some cases, so make sure you are organised before trying to make some of this bread. Similarly, don’t expect the same kind of lift in the oven that you get from normal bread- my loaf ended up rather flatter than I expected. Again, because of the acid, sourdough loaves are often slightly saltier, as this limits the bacterial growth and helps tighten the gluten networks. Otherwise, making sourdough bread is very similar to making regular bread.

Sourdough Starter on Day 6. More yeasty than yoghurty aromas, very bubbly. Ready to go.

Sourdough Starter on Day 6. More yeasty than yoghurty aromas, very bubbly. Ready to go.

Despite it being my first attempt, I got pretty reasonable results. As I said, the dough was quite flat, but I wouldn’t say it was dense, as my first attempts at regular bread were. I made my starter our of strong white bread flour, but different types of flours will give you starters that work in slightly different ways, so it might be that I try a spelt starter, for example. But I guess these are all things I can begin to explore once as my starter matures, and as I start to understand the chemistry going on.

Sourdough bread

This recipe is adapted from one in The Forgotten Skills of Cooking. I made one large loaf with these quantities. Reminder: the rising and proving times are long, so make sure you are organised before you try to make a loaf.

Ingredients:
1 sourdough starter, as described above
600ml tepid water
1.15kg strong white bread flour
2 tbsp rye flour

Recipe:
1. Make the starter. See above.
2. Make the foam. Add 225g of flour and 225g water to the starter. Mix well, then cover and leave overnight. The next morning, add 225g flour and 225g water, mix well, and leave for 5-6 hours. When this is done, take out 450g to be your starter for the next loaf (you can refrigerate this for around two weeks).
3. Make the dough. Add the remaining ingredients and mix well. Knead (ideally in an electric mixer) for 6 minutes. Cover and leave for around 6-8 hours until the dough has doubled in size. Knock back the air, shape into loaves or baguettes as desired, then dust generously with flour. Cover and put in the fridge overnight.
4. Make the bread. Return the dough to room temperature and leave for around an hour. Preheat the oven to 230ºC. Bake for 35 minutes, leaving to cool on a wire rack when the bread is done.

The finished loaf. Great toasted.

The finished loaf. Great toasted.

Oxmas: Brining a Turkey

Oxford is a strange place to be for lots of reasons, one of which is the concept of ‘Oxmas’. Because the University terms are so short, lasting only eight weeks, term finishes very early- this year on Saturday 1st December. If you want a college or society Christmas dinner while everybody is still around, it’s got to happen in the last week of term, i.e. November. All this adds up to spending the last week of November going to carol services, eating turkey and minced pies, drinking mulled wine, and giving your friends gifts before going home and waiting three weeks for Christmas to arrive for everybody else. Very strange.

TurkeyBrine_XmasPudding

Oxmas has become an annual tradition now in the Oxfood household, with old university and school friends coming back in early December to catch up, pull crackers, and enjoy some good food. Each year I try to make something different, still sticking on the theme of roast turkey, and, of course, trying to make the food better than last year’s meal. Last year I made a three-bird roast, with a turkey, duck, and pheasant, sowing the entire thing together to create an enormous ‘meat pillow’. The previous year was Christmas dinner en miniature, with a roast poussin each and tiny roast vegetables on everybody’s plates. Christmas pudding has also come in various guises too. Last year was a Christmas pudding millefeuille, with brandy crème patisserie, and the previous year Christmas crackers, made out of filo pastry with Christmas pudding inside. Hard to top? This year I just tried to make basic roast turkey, and Christmas pudding, as well as I could. The ‘Oxmas pudding‘ was made months in advance, but the turkey required more though.

As is well known, one of the main problems with turkey is keeping it moist. There are lots of different solutions- foil, butter, basting for example- but the one I wanted to try this year was brining. Brining involves marinating the meat in a salt solution- the brine- for a few days beforehand, so that the meat can absorb more water to keep it moist in cooking. According to Harold McGee’s ‘McGee on Food and Cooking’, the salting has two main effects. Firstly protein filaments, which normally coagulate into dense substances when cooked, are dissolved, resulting in meat which is more tender. Secondly, the salt causes the an increase in water capacity of the muscle, so the meat can absorb about 10% of its mass in water. You still lose water in cooking, but the meat retains more water through brining. Similarly, the areas of the turkey which are most prone to overcooking- the outside- have absorbed the most water.

It is interesting then to compare this to ‘dry-brining’, which is not much more than salting. I talked to a few friends about cooking turkey beforehand, and they all recommended dry-brining, as it was quicker and easier to do. Given the science of brining above, you would achieve the first effect of dissolving protein filaments, creating a more tender turkey. The second effect of plumping up the turkey with water would not happen, however, so you would still lose the same amount of moisture during cooking as regular turkey. In the quest to get the turkey really moist, it was clear dry-brining wouldn’t do.

TurkeyBrine_Turkey

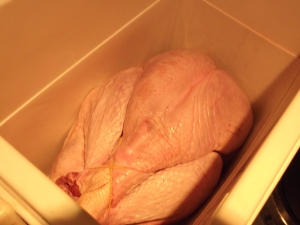
There are, additionally, some problems with brining a turkey. Firstly, the logistics. We had large number of people to feed, so needed a big bird. Where do you store a large turkey, along with around 12 litres of brine, for a few days? One option was to buy a disposable plastic bin, but fortunately we had a cool box we borrowed, which (just) fit our turkey inside along with all the brine we needed. Keeping it cool was another challenge (although we weren’t that concerned given how salty the environment was), but we needed a good few ice trays to keep the temperature down. The logistics of brining are definitely worth thinking about if you are going to brine a large animal yourself.

The second problem was a culinary one though. As you would expect, the meat is quite salty, as are the juices which come off it. We rarely eat salty food, so were worried the salt would dominate the flavour of the meat. If you want to make gravy out of the juices, either it will be extremely salty, or you’ll have to blend it with another liquid (we used cider, which worked well). The recipe below also adds a fair amount of sugar to the brine, as sugar counteracts salt on your palate, which can be another solution to this problem.

TurkeyBrine_Cooked

Overall, I would say that the results were mixed. The texture of the turkey was very good, moist as you would hope, and this was agreed by all of the diners. But I think the brine affected the taste of the turkey too much. It was quite salty, but not as bad as it could have been, but the herbs and spices in the brine came through too strong, and the taste of the turkey was too complex. I’m not sure I would do a brined turkey again, because of the taste. Given the effort it took, and considering there are other good methods to keep a turkey moist, it was just too much. A fun culinary experiment though, and a great Oxmas.

Brine

I took this recipe from Nose To Tail Eating. You may need to make several quantities for the whole turkey.

Ingredients:
400g brown sugar
600g sea salt
12 juniper berries
12 cloves
12 black peppercorns
3 bay leaves
4 litres water

Recipe:
Make the brine. Boil all the ingredients up together in a large (or several) pans, making sure the sugar and salt have dissolved. Leave to cool before applying to the meat.

TurkeyBrine_Brine

Does using different flour make a difference?

Flour is something we use everyday in cooking. There are so many types of flour available in supermarkets, too. When cooking, I always want to produce the best food I can, but you can only go as far as your ingredients will take you. So, in cooking, which flour is best for which food? Is it worth paying more for more expensive flours? How much do you “lose” for using the wrong type of flour? I don’t have a lot of experience with flours, so I decided to find out.

The main consideration in flour is gluten. Gluten is a complicated mix of wheat proteins that don’t dissolve in water. When wetted, though, the proteins can change their shape, forming and breaking bonds with each other. The gluten network changes its shape under pressure, reverts back to the original shape once the pressure is removed. This means when yeast produces carbon dioxide, the walls of the dough don’t break, important for bread-making. Similarly, this elasticity relaxes with time, keeping the dough taut. This network of dough and air gives the bread its texture: lightest, high-rising, chewy bread from high-gluten flour, as opposed to denser, crumbier bread from lower-gluten flour. So for some applications, you want lots of gluten, for others, you don’t:

Not all baked goods benefit from a strong, elastic gluten. It’s desirable in yeasted breads, bagels, and in puff pastry; but it gives an undesirable toughness to other forms of pastry, to raised cakes, griddle cakes, and cookies. For tender preparations, bakers intentionally limit the development of gluten (McGee on Food and Cooking, p523).

For bread, where we want the gluten network to develop, will be affected significantly by different types of flour:

“Bread flours” are milled from high-protein wheats, require a long kneading period to develop their strong gluten, and produce well-raised loaves with a distinctive, slightly eggy flavour and chewy texture. Lower-protein “all-purpose” flours give breads with a lower maximum volume, more neutral flavour, and less chewy texture, while flours from soft durum wheat with weak gluten proteins make denser loaves with a tender, cake-like crumb (McGee on Food and Cooking, p535).

Cakes on the other hand, don’t want the gluten network to develop, so we would expect softer flours to actually perform better:

A cake’s structure is created mainly by flour starch and by egg protein. The tender, melt-in-the-mouth texture comes from gas bubbles, which subdivide the batter into fragile sheets, and from the sugar and fat, which interfere with gluten formation and egg protein coagulation, and interrupt the network of gelated starch (McGee on Food and Cooking, p554).

So to test out which how different flours fared for different baking purposes, and how this theory turned out in practice, I got 5 varieties of flour, and then made some bread, and some cake. I usually make bread for everyday consumption, so price does factor in choice of flour considerably, but every now and then I would like to be able to make something a bit more exciting. Cakes I make much less often. Typically cakes are made to be eaten by others- birthday cakes, tea and cake, for example. So when I do make a cake, I want it to be good, so I’ll probably pay for better ingredients if I can. But just understanding how different types of flour worked, and what the end results were, was interesting in itself. The five varieties of flour tested were: Mcdougall’s Self Raising Supreme Sponge Flour (£1.78/kg), Tesco Everyday Value Self Raising Flour (£0.35/kg), Tesco Plain Flour (£0.60/kg), Tesco Strong White Bread Flour (£0.40/kg), and Allinson Strong White Bread Flour (£0.67/kg).

For reference, according to McGee on Food and Cooking, I would expect the bread flours to have protein contents of 12-13%, the all-purpose flours protein contents of 7-10%, and the cake flour 7-8% protein content. This is just part of the story though, there will be a lot of differences in milling methods and how the flours are processed, which contributes to the final product.

When making the case, I tried as much as possible to be scientific, although since I did not want to be overrun with cupcakes, I only made small quantities, and so relative measurement errors will have been higher. The recipe was as simple as I could think of: flour, butter, sugar, and eggs, so that any effects of different flours would be more easily seen. The cupcakes came out as follows:

Cupcake 1: Supreme Sponge Flour
Definitely the lightest and fluffiest in texture. Also, interestingly, this one came out the most bright, a very appealing yellow. The butter flavour had integrated really well into the flour, and there wasn’t a fatty taste leftover.

Cupcake 2: Everyday Value Flour
Crunchy, and with an uneven distribution of texture- the butter and egg seemed to have sunk to the bottom and not integrated properly with the flour. Poor development of flavours.

Cupcake 3: Plain Flour
Quite reasonable, the best of the rest. A little crispy, meally, and dry. I got more floury flavours coming through, so thought this one was the bread flour.

Cupcake 4: Bread Flour
Good crispiness on top, a little meally, but an uneventful cupcake. Very similar to the plain flour, hard to tell apart.

After we made the cupcakes, my resident cupcake enthusiast and I swapped the order around and tried to guess which was which. The only one we both got correct was the supreme sponge flour cupcake- significantly better than the others, it wasn’t really close. I thought the everyday value flour was easy too, having a significantly poorer quality texture. Neither of us could tell the plain flour and bread flour cupcakes apart, though. Conclusion: it’s probably worth paying the extra for supreme sponge flour, and don’t use cheap flour.

For the bread, I was more interested in the differences between different types of bread flour, but also how plain flour fared. It was particularly difficult to be scientific here, as I could not knead all the bread at once, so some batches had 15-20 minutes more rising time than others. As with the cupcakes, the bread recipe was as simple as can be, flour, water, salt, yeast. The rolls came out as follows:

Roll 1: Supreme Sponge Flour
A very white roll. Hardly rose at all. Bad aftertaste from the baking powder, but otherwise pleasant taste. Smooth texture, but very dense.

Roll 2: Everyday Value Flour
Less dense, and crusty. Tasted poor, with the bad aftertaste from the baking powder. A little meally. Didn’t rise a lot.

Roll 3: Plain Flour
Very crusty, dry, and dense. Neutral flavour. Didn’t rise a lot

Roll 4: Tesco Bread Flour
Good texture, nice leathery crust, risen considerably more. Nice bready taste.

Roll 5: Hovis Bread Flour
Very similar to the Tesco bread flour, no discernible differences.

Overall the results were pretty clear: you need a flour with high gluten content to make a good bread. The plain and everyday flours rose poorly, and, worse of the lot, the supreme sponge flour barely rose at all. Using different flour makes a big difference, so definitely buy some bread flour here. Within the bread flours, I didn’t notice any difference in the finished product, so the difference in price is what will drive my purchase here. Perhaps the Tesco bread flour is unexpectedly good. Conclusion: buy bread flour, it seems that the difference in gluten is more important than flour quality, as the theory suggests.

A fun afternoon’s baking, but I am pleased with the results. Of course, there are a lot of other things going on with flour than gluten, but it’s a start to understanding flours. It’s worth having confidence in the ingredients you use, and understanding properly what processes like kneading will do to the finished product. If you understand these, you’ll help get the cooking right, and food will taste better, which is really what it is about.

Blackberry and Port Ice Cream

Most of the blackberries in my life have been destined either for a crumble or for jam. Last time we went out picking blackberries, there was a great crop, so we got both a large crumble and a large pot of jam out of them. So when we went out to pick some more- blackberries are free food after all- I wanted to be a bit more creative with what we made out of them. We didn’t get so many this time, just what we needed; there are still plenty of blackberries out there to pick. Collecting some blackberries, and cooking with them, makes for a great evening or weekend activity.

In the UK, blackberries are usually in season from late August to early November, but they seemed to be in early this year, perhaps due to the fact we seem to have skipped summer. I used to pick loads of blackberries as a kid- we would take tubs out to hedgerows and collect several kilos- then make crumble, jam, or just freeze our spoils. Perhaps the reason why even kids can pick them, blackberries are probably the easiest wild fruit to identify and pick. They’ll occur on many hedgerows on bramble-y plants, and the fruit turns black when ripe. The ones you want to pick are the ones that come off the plant easily- if they don’t, they are probably not ripe. Similarly, don’t pick the ones below knee-height, as dogs may have ..er.. spoiled the fruit for you.

You can make ice cream without an ice cream maker, but it is tricky. The keep to making a good ice cream is to get small water crystals forming, as this creates the smooth texture you want. Ice cream makers work by churning the ice cream as the cream mixture is freezing, to stop large water crystals forming, and to create this churning effect by hand requires a lot of patience- you put the cream in a tub in the freezer, then every ten minutes, give it a good stir with a fork, then put it back. I’ve had ice cream made this way, and the texture has been fine, but the effort that goes into it is considerable. I use this Cuisinart ice cream maker, which I got for Christmas a couple of years ago, and I’ve been very pleased with it. It requires pre-freezing a bowl, typical among the cheaper ice cream makers- so make sure you get a large bowl that can cool down your cream quickly. The bowl with this machine is quite large, make sure your freezer can fit it inside. Ice creams are very easy to make, and can add a lot to a pudding for little effort.

This ice cream is a variation on a fig and port ice cream I made a while ago- as blackberries and figs grow around the same time of year, the blackberry and port combination should work well too. In general, you have to be very wary when adding alcohol to ice cream mixtures, as it will lower the freezing point of your mixture, and so you may not get ice cream anymore, but very cold cream. Assuming you have added some sugar as well, you can have around 15-20% concentration by weight of alcohol before your ice cream won’t freeze in a domestic freezer anymore (result taken from The Kitchen As Laboratory). This might seem like a lot, and it is, but the problem often comes in getting your ice cream maker to get that cold for the initial freezing. However, here, we don’t need to worry about this: the alcohol is boiled off when stewing the blackberries in the port. So if you like the port taste, like I do, then feel free to be a bit liberal with the quantity.

Blackberry and Port Ice Cream

Ingredients:
400g blackberries
100ml port (I used a Ruby port, as it is cheap)
500ml double cream
500ml milk
80g caster sugar
20g liquid glucose

Recipe:
1. Purée the blackberries. Put the blackberries in a frying pan with the port. Stew over a medium heat until the blackberries are soft and mushy. At this point you can purée with blackberries with a hand blender, and strain them, but personally I quite like the rustic rough texture without puréeing them.
2. Make the ice cream. Add the purée to the milk, cream, caster sugar, and liquid glucose, and leave in the fridge overnight. Then make into ice cream in an ice cream maker according to the manufacturer’s instructions.

Pink Fluffy Marshmallows

Home-made marshmallows are a fun gift from the kitchen. Who doesn’t like marshmallows? Soft, fluffy, and airy, these marshmallows are surprisingly easy to make, and brought back childhood memories of buying a big bag of marshmallows and eating far too many. Gifts from the kitchen show you’ve put thought, time and effort into something, and if you’ve done it well, what you’ve produced can often be better than something store bought. However you feel about marshmallows, they are a lot of fun to make as a weekend cooking activity, to colour and to flavour, and, of course, to eat.

Marshmallow, as a food, is very similar in structure to nougat, and even boiled sweets, but with a couple of key differences. The basic process is the same: you start off with a sugar syrup, heat it up until the water concentration decreases to the level which will give you the texture you want, then cool it. But if you simply used a normal sugar syrup, you’d end up still with a dense nougat-like texture. So how do you get marshmallow nice and fluffy? Firstly, by the addition of gelatin. In nougat, the stabilising agent is the sugar syrup, creating sugar crystals, which also creates the dense texture. But with gelatin added, you get the desirable additional stability without the undesirable extra density. Secondly, the water content of the marshmallow mixture is much much higher. Right before you add the sugar syrup to the egg white, you add more water, a step which doesn’t happen making nougat. Water can absorb air and so become foamy, which is then stabilised with egg white, sugar, and gelatin, as well as reducing the density of the mixture. Overall, a light and very fluffy mix, but one that will still set solid.

Marshmallows are easy to flavour and colour as well. Once the basic mixture is made, you can add fruit purees (the pectin in the fruit will additionally help the marshmallow to set) and different food colourings. You can also split the mixture in half, finish each batch differently, then set them together to make ‘two-tone’ marshmallows. The sky is the limit. A fun morning’s cooking, and then a fun evening eating them.

Pink Fluffy Marshmallows

The recipe here is taken from The Home-Made Sweet Shop. As with nougat, an electric mixer is a must here- you just can’t incorporate the sugar syrup into the egg white quickly enough without one. Similarly, you’ll need a sugar thermometer, but these are inexpensive. This recipe will make a large baking tray’s worth, and should keep in the fridge for a few days.

Ingredients:
50g icing sugar
50g cornflour
small amount olive oil for greasing
2 egg whites
400g caster sugar
15ml liquid glucose
375ml cold water
4tbsp powdered/12 sheets gelatin
5ml vanilla extract
12 drops pink food colouring

Recipe:
1. Prepare the baking tray. Grease the tray with some of the olive oil. Then sift together the icing sugar and cornflour, and sprinkle half of it on the greased baking tray. Shake around until evenly covered.
2. Prepare the syrup, eggs, and gelatin. In a heavy based pan, heat up the caster sugar, 185ml of the water, and the liquid glucose until at the hard ball stage (130°C), using a sugar thermometer to measure the temperature. Meanwhile, soak the gelatin in the rest of the cold water, and whip the egg white to firm peaks in an electric mixer.
3. Make the marshmallow. Right as the sugar reaches the hard ball stage, add the vanilla extract and gelatin and water mixture. With the electric mixer on high, slowly pour in the sugar syrup into the egg whites. Continue to beat the mixture once the sugar syrup is incorporated until the mixture becomes stiff (this will take around 10 minutes). Finally, add the food colouring, and mix until homogeneous.
4. Set the marshmallow. Pour the marshmallow onto the tray, and spread evenly. Leave to set (this will take around 6 hours), then dust with the rest of the icing sugar/cornflour mix. Cur up into pieces and serve.

Browning Onions and The Maillard Reaction

The Maillard reaction is one of the more interesting chemical reactions in food science, partly as it occurs almost every day in your own kitchen. Basically it is the common browning of food as it cooks: bread, meat, coffee, vegetables, chips, pastry… pretty much all of your recipes will involve this reaction to some extent. You might brown some onions before adding mince for a lasagne, or brush egg yolk on pastry before cooking it, or sauté some meat before making a stew. The reaction breaks the food down into many different flavour compounds, releasing all the different tastes the food has. Perhaps this better taste and improved aromatics are why we have evolved to cook food that has browned, despite the end products being harder to digest.

Despite its importance in cooking and for the food industry, the Maillard reaction is not particularly well characterised . The original paper describing it was published by Louis-Camille Maillard in 1912, but was largely ignored for years, as late as 1948, when it was brought to the forefront by research looking at the loss of nutritional value in heating milk powders. The reaction occurs in three stages, producing various flavour compounds from a sugar and an amino acid (often coming from protein). Some examples of the flavour compounds produced from the Maillard reaction:

Compound class and associated flavour/aroma:
Pyrazines: Cooked, roasted, toasted, baked cereals
Alkylpyrazines:  Nutty, roasted, like in coffee
Alkylpyridines:  Green, bitter, astringent, burnt, like in coffee, barley, malt (generally regarded as unpleasant)
Furans, furanones, pyranones: Sweet, burnt, pungent, caramel-like
Oxazoles: Green, nutty, sweet like in cocoa, coffee, meat
Thiofenes: Meaty

What I am going to look at here, though, is how the Maillard reaction changes under different environmental conditions- like sugar, acid level, moisture level, and so on. Since browning your food is desirable, as you’ll get a nicer taste from it, understanding how to get your food to brown- or why it isn’t browning- will improve what ends up on the plate. We know that you need heat to get food to brown, but how else can you control it?

To test these, and particularly the relative speed of food browning, I spent an evening modifying an experiment from The Kitchen As Laboratory: chopping up some onions, subjecting them to different conditions, heating them, and seeing what happened. I looked at four different conditions (as I had four different hobs): 1) A control, just regular onion, 2) Onion with added bicarbonate of soda, 3) Onion with added lemon juice, and 4) Onion with some added sugar. With the sugared onions, only a moderate amount could be put on the sugar, otherwise a caramelisation reaction might occur, which is different from the Maillard reaction, and would affect the results.

Four variations of onion mix. There are control onions (top left), onions with baking powder (top right), onions with sugar (bottom left), and onions with lemon juice (bottom right).

These choices, of course, were based on ideas of what should happen. Theoretically, the baking soda onion should be the fastest to brown, as alkaline conditions promote the reaction, followed by the sugared onion, as more sugar is available to fund the reaction. The lemon juice onion was a bit of a wild card, as there are several bits of theory working here. Acid is supposed to reduce the speed of browning, but the moderate water content (and I suppose a little sugar) is supposed to increase it. The control onions and the lemon juiced onion would then fight it out for the bottom spot. All the onions were dry-fried, that is no oil or butter was in the pan.

After seven minutes on a medium heat, I removed the onions from the pan. The baking soda onions had won by far, massively browning compared to the rest, most of which happened in the first minute of cooking. The sugared onions and lemon juiced onions had browned a similar amount, I suppose that the moisture factors helping the lemon juiced onions outweighed the detracting acidity. The control onions, though, had browned poorly, but of course were the only ones that you might actually want to eat.

Onions after browning. There are control onions (top left), baking soda onions (top right), lemon juice onions (bottom left), and sugar onions (bottom right).

So, to summarise: alkali, sugar, protein, high heat, and moderate water content all speed up the Maillard reaction, acid, lots or little water, and low heat all slow down the Maillard reaction. So if you are cooking something, especially if you are making up your own recipe, think about how you are browning food, and how you want to develop flavour. A friend once characterised all British food as “brown”… perhaps that is not such a bad thing after all.

Making Rhubarb and Custard Sweets

Rhubarb and Custard Sweets, ironically, contain neither rhubarb nor custard. Their history is based on a rhubarb and vanilla custard pudding that was popular, then when candy making became popular due to the importing of sugar, this pudding was made into a hard sweet. Ever since they have been popular- they’ve always been my favourite sweet (and believe me I ate many of them as a child)- and you’ll find these in most traditional British sweet shops. So, if rhubarb and custards don’t have rhubarb or custard, what do they have?

Tartaric acid, possibly better known as E334, is one of the key ingredients in rhubarb and custard sweets. You won’t find it in supermarkets, but is is easy to get hold of online. It occurs naturally in some fruits, particularly bananas and grapes, the latter suggesting why tartaric acid is one of the main acids in wine. You may have notice small crystals on the corks of wine bottles from time to time- these are tartrate crystals forming, totally harmless and not a fault with the wine. So what does tartaric acid do? Basically, I would say it is ‘pure sour’. I dipped my finger into the tub to taste a little bit before making the sweets- my goodness!- even worse than the acid from pinot grigio, if that is possible. I imagine the tartaric acid is used in many other sour sweets as well, as the taste was quite familiar. A lot of fun to have tried a little of the acid, and key taste in the sweets, but a little will clearly go a long way in making the rhubarb and custards.

On to the sweet-making process. In some sense, making hard candy like this is similar to making nougat (my post there has a few more details on the process). You start off with a sugar syrup, heat it up until the water concentration decreases to the level which will give you the texture you want, then cool it. The cooling process itself is quite interesting. Often the candy is aerated, to help stability and create a chewier candy- this video is a nice example. In nougat, the air comes in the meringue, but with sweets, it is usually pulling, or working the sugar that provides this aeration and change in texture. This aeration makes the key difference in texture between the ‘rhubarb’ and the ‘custard’. Both start from the same syrup, but the custard is the part which is aerated, giving it a very different texture than the harder, brittler rhubarb part. Interestingly as well:

When the high-boiled sweet is cooled, it is in a glassy state or it is a liquid with extremely high viscosity and non-crystalline in nature. The high viscosity of the doctoring agent [liquid glucose here] slows or stops the migration of sucrose molecules and thus interferes with the process of recrystallization. Although highboiled sweets appear solid, they are, in fact, supercooled, non-crystalline liquids, which are so far below their softening or melting point that they assume solid properties without crystallizing.

So how well would these processes work in the domestic kitchen? Well, making the sugar syrup itself is no problem, but when I tried it, manipulating the syrup was more tricky. First of all it will be no surprise to hear it was very very sticky, so moving it from place to place, especially when it was spread out over a large surface, was no easy task. But most of the difficulty came in keeping it easy to aerate. To work the candy at home, you pull and twist the ball of warm sugar. For this, you’ve got a balance- either the sugar is hot, and easy to aerate, but hard to handle with your hands, or cold, and hard to aerate as it is tough to work, but easier to handle. Either way, I got a whole load of blisters trying to aerate it, and I’m not sure whether it was the heat, the toughness, or both. It is easy to see why they industrialised this.

One Saturday, when a friend was over to do some cooking, we decided to have a go at making rhubarb and custards. Despite the above difficulties, we were very pleased with the results, the sweets tasting very much like the ones bought from the store, and the real vanilla adding a nice touch. The texture was good as well, very hard and sticky as they cooled. The rhubarb strand and the custard strand had no problem sticking together and staying that way. A lot of fun to have made, but given the state of my hands afterwards, I might stick to the bought version next time!

Rhubarb and Custard Sweets

The recipe here is based on one from The Home-Made Sweet Shop. You’ll need some kit for this- a pastry scraper being the main one, it will be very useful in handling the hot sugar syrup. The book suggests using a marble slab to put the sugar syrup on, but I used a baking tray covered with a silicone baking sheet. I would imagine that regular baking paper wouldn’t work here, likely tearing at several points. A sugar thermometer is also key. This recipe will make a jar’s worth of rhubarb and custards- mine filled a small coffee jar, apart from the, er, casualties along the way.

Ingredients:
450g caster sugar
150ml water
1.5ml cream of tartar
15ml liquid glucose
2tsp tartaric acid
1 vanilla pod
pink food colouring

Recipe:
1. Make the sugar syrup.
Prepare an ice/water bath- big enough to put a saucepan in. Add the sugar, water, cream of tartar and liquid glucose into a pan and heat gently until the sugar is dissolved. Turn up the heat, and boil until the soft crack stage, 143°C. Add the tartaric acid, stir in, and place the pan into your ice/water bath. Pour the half syrup onto a marble slab/non-stick baking tray, then put the saucepan with the other half in back onto a low heat on the hob (just to keep the syrup liquid).
2. Work the sugar syrup. Scrape the seeds from the vanilla pod, and pour over the sugar syrup on the marble slab/non-stick baking tray. Using the pastry scraper, fold the edges into the centre of the sugar syrup. Preheat the oven to 120°C. When cool enough to handle, lift the syrup off the marble slab/non-stick baking tray, and work it into a cylindrical shape. Take the ends of the syrup strand, pull them together to form a ‘U’ shape, twist the two strands together, and work into a cylindrical shape again. Continue this for around 15-20 minutes, placing the strand into the oven if it gets too tough. When you are done, put the strand back in the oven until you need it.

The yellow strand. It was long.

3. Assemble the sweets. Working quickly, pour the rest of the sugar syrup onto the marble slab/non-stick baking tray. Add 2-3 drops pink food colouring, and, when the syrup is cool enough, shape into a long cylindrical strand. This syrup will be quite gloopy, so you might want to leave it to cool a bit more than you think you need to. Take the yellow syrup from the oven, and shape into a cylindrical strand of the same length as the pink strand. Tease the two strands together. Oil some scissors and cut the strands into the right sized pieces. Dust with caster sugar.

Making Pistachio Nougat

I like giving gifts that I’ve made in the kitchen. They show you’ve put thought, time and effort into something, and if you’ve done it well, what you’ve produced can often be better than something store bought. There are loads of gifts you can make; previously I’ve done mead, limoncello, Bailey’s and white chocolate fudge, biscotti, flavoured oils and vinegars, and chocolates, for a sample of ideas. The latest gift idea I wanted to try out was nougat- I think a box of home-made nougat is a great present- and making nougat would be a chance to develop some confectionery skills too.

As I found out when making it, nougat is essentially a super dense meringue. You make nougat in the same way you might make an Italian meringue (the kind of meringue you might use for icing cakes or baked Alaska), by heating up some sugary syrup and whisking into some whipped egg whites. There are two key differences though.

Firstly, with Italian meringue, the sugar syrup is heated up to the “soft ball stage”, around 115°C, where as in making nougat, a sugar syrup-honey combination is heated up to the “soft crack stage”, around 143°C. This extra heating changes the sugar concentration of the sugar syrup from 85% to 95%, and so the syrup is denser with sugar crystals, creating a denser end product.

The second key difference is the ratio of egg white to sugar syrup. In an Italian meringue, you use 4 egg whites to 250g sugar, but with nougat, it’s 2 egg whites to around 550g of sugar. Again, this ratio means you have a much higher sugar concentration, and hence a much denser end product. Using honey in the sugar syrup in nougat is really just for flavouring: honey has a similar composition to sugar syrup (17% water, 83% sugar by weight).

While we are talking about the science of nougat, it is worth mentioning the addition of liquid glucose. When the sugar syrup cools, sugar crystals begin to form. If left to their own devices, they will form larger crystals which will result in a coarse texture of nougat. The liquid glucose prevents these larger crystal from forming “by bonding temporarily to the crystal surface and blocking the way of sucrose molecules” (Harold McGee, ‘McGee on Food and Cooking’). This means smaller crystals form making for a smoother, finer, more desirable nougat. Liquid glucose is also frequently used in ice-cream and sorbet making for the same reason. On to making the nougat.

It’s tough to make nougat without the use of an electric mixer. The reason is that one of the main stages of the recipe is pouring the 143°C sugar syrup into the whisked egg white. If you aren’t whisking very quickly while you do this, the sugar just forms lumps of cooled sugar, which then don’t mix with the egg white at all. I’ve tried using other electric whisks to incorporate the syrup previously as well, but these also tend to end up in failure as the sugar syrup solidifies on the blades of the whisk, and so the blades jam, and then you don’t have time to un-jam the blades before the sugar syrup cools again. Don’t let this problem put you off attempting to make some nougat yourself, but if you do, be very careful at this stage to incorporate the sugar syrup into the egg white properly.

The recipe I’ve used here is from The Home-Made Sweet Shop. Once you’ve made the basic nougat, the pistachios and almonds which are added at the end are easily interchangeable with other nuts, dried or candied fruits, or anything else that takes your fancy. The recipe also states that the nougat takes 4 hours to set; mine took a lot longer (2 days). I’m still trying to figure out quite why, as it did set properly eventually, but if you are going to give it as a gift, make sure you’ve made it a little in advance.

Pistachio Nougat

Ingredients:
375g caster sugar
25g liquid glucose
100ml water
175g honey
2 egg whites
200g shelled pistachios
200g whole almonds
5ml orange blossom water
Rice paper (I used greaseproof paper)

Instructions:
1. Whisk the egg whites with 25g of the caster sugar in an electric mixer until you get firm peaks.
2. Line a baking tray with rice paper.
3. Put the honey in one saucepan, and the mixed liquid glucose, water, and sugar in another. Heat the sugar and water to the soft crack stage at 143°C. Bring the honey to the boil, and once it has reached this point, add to the sugar syrup and bring the mixture back to 143°C.
4. With the whisk on full speed, slowly pour the sugar syrup into the egg whites, incorporating it as well as possible. At the end, you should end up with a stiff, glossy, homogeneous mixture.
5. Fold in pistachios, almonds, and orange blossom water.
6. With a spatula, spread the mixture onto the baking tray, cover with another piece of rice paper, and leave to set. This will take sometime between 4 hours and 2 days. Don’t leave the nougat somewhere where there are strong aromas, as the nougat with absorb these and taste off.
7. Once the nougat has set, cut into pieces. The nougat should last about a week, possibly more in an airtight container.

Xanthan Gum and Strawberry Milkshakes

Can anybody guess what this is?

Water, cellulose, sugars (fructose, sucrose, glucose, maltose), oligosaccharides, starch (amylose, amylopectin), citric acid, malic acid, lactic acid, alcohols, aldehydes, ethylene, aromatic sulfur compounds, tomatine, furaneol, glutamate, carotenoids, lycopene, glutation, vitamin C, vitamin A, potassium, fatty acids and acyglycerols (one or more of the following: myristic acid, palmitic acid, stearic acid, oleic acid, linoleic acid, arachidic acid, behenic acid or other free fatty acids), phospholipids, phytoene, phytofluene, tocopherols, sterols.

No? Me neither. It’s a tomato. Kind of shocking when you look at it, but at the same time unsurprising: food is just made up of chemicals.

It’s harder for me to think of food in this way, as atoms, molecules, and compounds, as chemistry is an area I don’t know a lot about. When food says “no additives or preservatives”, I just assume these “additives” and “preservatives” are undesirable to consume, without a second thought. But when I do stop to think about it, I do wonder: salt, vinegar and lemon juice are all preservatives, and we have these all the time. So which preservatives are the ‘okay’ ones, and which ones are the ‘bad’ ones? Perhaps we’ve just given bad press to anything that sounds science-y in our food.

Xanthan gum is a victim of this bad press, I feel, and the name starting with an ‘x’ hardly helps. It’s produced by the fermentation of sugar by the bacterium Xanthomonas campestrisin a similar way to how Saccharomyces cerevisiae (common yeast) ferments sugars to produce alcohol, or in bread-making. You could even call Xanthan gum a natural ingredient.

The gum produced by the bacterium is used as a thickening and stabilising agent, with applications like gluten-free baking, keeping the oil and vinegar together in a vinaigrette, or thickening sauces without using a roux. The Kitchen as Laboratory use it, along with nitrous oxide, to create the perfect sponge cake texture. It is usually used at only 0.5% of the volume of the liquid, such is its thickening power. For me to see the benefits of using Xanthan gum, though, like with the Balsamic Caviar it was important to have an application that would be useful, and not just novelty, as some molecular gastronomy experiments can be.

My desired use of Xanthan gum was in a strawberry milkshake. I personally like really thick milkshakes, and the solution to this is usually “add loads of banana”. Of course, the problem is that the milkshake just ends up tasting like banana. What’s more, if you’ve started off with a more delicate flavour, like strawberry, the banana can be so overpowering, you forget what fruit you put in to begin with. So, hopefully, with the addition of Xanthan gum, I could create a nice thick milkshake, tasting solely of strawberry, to go with the nice weather we are beginning to have.

So, to test the thickening effects of the gum, I made a simple strawberry milkshake recipe below, firstly without the Xanthan gum, so that I could get a base for comparison. The taste of the first batch was nice, but the texture was thin and sloppy, almost like drinking strawberry milk. Putting the Xanthan gum in, though, and it was a different story. A nice thick milkshake had been produced, tasting entirely of strawberry, exactly what I was looking for. The change in thickness really was remarkable, just caused by putting the gum in. Another great result for molecular gastronomy; an application where traditional methods would have struggled. All that’s left now is to enjoy the leftover milkshake, and to bring on the summer.

Strawberry Milkshake

Ingredients:
300g strawberries
1 tbsp sugar
250ml milk
6 ice cubes
1g Xanthan gum

Instructions:
1. Put all the ingredients in a blender. Blend.

The finished milkshake, with Xanthan Gum. It’s hard to see the change in viscosity in a photo, but this was one thick milkshake.

Balsamic Caviar

Last Christmas, I was given a Molecular Gastronomy Kit. I wanted to explore kitchen science a little more, and using this was a nice way to try some different things, without getting into the science too deeply. The kit itself is well put together- sachets of various chemicals, syringes, pipettes, tubing, and so on. It also comes with a DVD, demonstrating the recipes (although annoyingly no printable recipes), so you can see exactly how everything is done, in a true Blue Peter “here’s one I made earlier” style. Watching with fascination all of the strange things being created, one of the things that initially caught my eye was the recipe for “balsamic caviar”. Drops of balsamic vinegar are given much more surface tension to create little balls, looking and feeling a similar way to real caviar.

The main reason I got excited about this though, is that I could actually see a use for it as part of a meal, rather than creating something that is little more than novelty value. A good few of the recipes were just that: here’s something that has the texture and looks like an egg, but tastes like mango with vanilla milk. Even though this is fun, it’s important to keep a general view towards gastronomy. In modern culture, we can often overemphasise one part of gastronomy- like having environmentally friendly, organic food- and forget that it is just part of the meal and the culture we should have towards food. Getting swept up by new tricks in the kitchen is another example of this- if what you produce isn’t a great meal, it doesn’t matter how much science is in it, the meal is still bad. So, hopefully the balsamic caviar would be somewhere where I could apply science to make the food better, as well as more exciting. The target was an hor d’oeuvre- balsamic caviar and red pepper mousse on melba toast. Hopefully the balsamic caviar would be a way of taking the acidity and flavour of balsamic vinegar into this dish in a way you couldn’t do normally.

Some of the leftovers on a cracker

Making the balsamic caviar is actually pretty straightforward, if you have the right kit. First, put a small bottle of olive oil in the freezer for 45 minutes. Then, simply take 150ml balsamic vinegar and add to it 1 sachet (~3g) agar agar. Bring to the boil, then take the olive oil out of the freezer, and pour into a small bowl. Then, with a syringe, release small droplets of the hot vinegar into the oil, and it will form into the caviar. Take the freshly formed caviar out of the oil with a slotted spoon, and use some water to rinse it and help it separate. Put it into a bowl, and store in the fridge until you are ready to use it.

Overall I have been pretty pleased with results. The texture is good, and the desired acidity and flavour is there, nicely complementing the red pepper mousse. I’ve now done this recipe twice- the other use was in a mozzarella and tomato salad- and in both cases people enjoyed the novelty, as well as the taste. A nice first ‘molecular gastronomy’ recipe to try, I’m excited to see what else this kit can come up with.

Our balsamic caviar being made. Photo courtesy of Richard Kim.

Previous Older Entries